One of the most powerful elements in the rock drum mixing session are the snare drums. In fact, great rock songs are often associated with unique snare drum sound which we often remember throughout the years.
Snare drum mixing of the music by Led Zeppelin, The Outfield, Spin Doctors and Nirvana are my personal favorites because they sound loud, crispy, heavy and well mixed. Modern pop beat sadly puts less importance in drums particularly snare. But a well mixed snare drums can make the song worth remembering, so what are the EQ, compression and panning mixing tips for snare drums?
This tutorial puts more emphasis on rock music more than other genre like pop, jazz and country. The objective is to give the snare drums a great and loud sound.
Working with a properly recorded snare drum
The first key to having a good sounding snare in the mix is to have it recorded properly. The recording objective should be:
1. No clipping or distortion. Personally I have mixed projects with clipped snare drums. This results to distortion that sounds very bad. So there is no way to fix that during the mix and it needs to be re-recorded.
2. No extreme or disturbing bleeding noises from other drum instruments. (read: “Two Methods to Control Sound Bleeding in Multitrack Recording”
3. At least recorded at a reasonable sounding level with dynamics.
4.) Drum recording environment plays a big role in the resulting snare drum sound. For example, if you record drums in the center of the spacious big hall, the snare drum sound would have much more ambiance and reverb than recording in a heavily carpeted and concrete small rooms.
There are lots of factors influencing the sound of your snare. Refer to the following important tutorials to learn some techniques on how to properly record your drums:
Drum Mixing Tips and Techniques for Modern Rock Music -learn some ways on how you should be putting microphones on your snare drum. This will have a profound effect on the resulting sound.
Assuming you are on a budget, and would like to get a great drum sound out of 4 or even two microphones:
How to Record Drums with 4 mics
Recording & Mixing Drums using only Two Microphones
Reaper DAW Tutorial on Drum Recording– if you are using Reaper to record drums. This is a very useful tutorial for you.
You should also pay attention to the recording levels of the snare to prevent clipping (or distortion) as well as very poor S/N (signal to noise ratio). In rock music production, snare is commonly hit hard by the drummer which can easily overload your analog to digital converters. To make sure you are recording at optimum levels; you need to implement proper gain staging.
If you are using snare drum samples and not from actual drum kit recording; you need to make sure you are properly working with a high resolution audio samples (such as 24-bits). You can use great sounding drum sampler like Superior Drummer 2.0, etc.
EQ settings for snare
Let’s start with the most important, the EQ. It is important to know that EQ settings for snare drum mixing are treated differently between each song. There is no set of standard for EQ settings; however you can categorize them as follows (you can select on the following settings depending on your mixing application):
Heavy snare with crispy snare string sound:
Boost +3dB 100Hz, Q= 1.0
Cut -6dB 2000Hz Q= 1.4
Boost +3dB 8000 Hz Q = 1.0
Dominant and crispy snare sound
Cut -3dB 200Hz Q= 1.0
Boost 3dB 8000Hz Q=1.0
Since the following settings uses Q, you need a parametric equalizer to implement those settings. Bear in mind that the “dominant and crispy snare sound” is recommended only for instrumental rock music since 2000Hz – 3000Hz frequency range are not cut. If these are used in music with vocals, the snare drum may drowned the vocal frequencies affecting vocal clarity.
Snare Compression- How the sound changes with different settings
The second are the compression settings which I already mentioned in this tutorial: “Audio compression tips for mixing”.
Attack: 20ms
Release: 40ms
Threshold: -12dB
Compression ratio: 5:1
Feel free to experiment the attack and release settings. The compression ratio can also be set to 4:1 depending on your flavor. Lastly the panning settings; most engineers can pan the snare drums at the center. But in reality the snare drums are not perfectly located in the center of the mix. When you visualize the real drums, it is a little off-center. So I recommend to use 6.25 units to the right. In your mixing software, an instrument panned to the right will have a positive sign while panned to the left is negative, so it will be +6.25. More details are discussed in this tutorial: “How to pan drum instruments”.
The examples below illustrates how the snare drum sound changes with 5 different compression settings. This is a useful guide for a beginner in choosing the best compression settings for the snare. Let’s get started with the default settings (original and uncompressed snare):
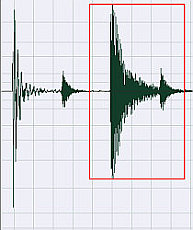
This is how the snare waveform looks like “uncompressed”:
Supposing you want to apply this first compression setting:
-30.4dB threshold
2:1 Compression ratio
Scan mode: RMS
Smooth saturation: Yes
Attack time: 5ms
Release time: 10ms
Output gain: 7.6dB
The threshold depends on the peak of the snare drum; feel free to experiment to get the optimum threshold. The compressor that I’m using is the Sony Wave Hammer. This is the resulting sound:
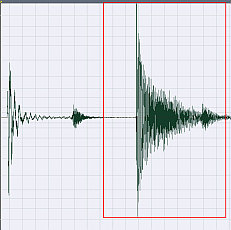
The snare drum sounds scratchy. It adds more character to snare drum wires and also the snare drum sounds a bit sustain more than the original. Although this sound is not as thick as the other compression settings to be illustrated later on. If you need your snare drum to sound like this. You can start implementing the above settings. The output gain is adjustable depending on your desired snare drum volume. This is how the waveform looks like for the first setting:
Comparing with the uncompressed wave, compressing with very fast attack time and release time results to less energy at the maximum peak of the snare drum; as you have noticed that peak section is now thinner compared with the uncompressed snare. Let’s try this second setting:


