
When it comes to recording vocals, it is important to get the best quality as possible taking into account the vocals are the most important track in the mix or even in a song. Aside from having a great singer to perform the tracks, it is also very important to use the correct vocal microphones. To record vocals properly in your home studio, the most recommended microphone is a condenser type microphone. The primary reason is that it has a wider frequency response, more sensitive and greater transient response which is highly needed for vocal recordings (in the next page of this article; you will know more about these differences).
All beginners in recording studio do not put much importance to vocal recording quality and they opt to find a cheaper alternative by not using standard vocal condenser microphones. The reason is that they ran out of budget to buy these microphones because they are too expensive to use.
In reality, you can actually buy condenser vocal microphones to be used for vocal recordings at the lowest price as possible. This makes it affordable to any home recording studio beginners. This does not mean that buying low price will compromise the quality of the recorded vocal tracks.
In fact, I seriously studied a lot of vocal condenser microphones which are cheap/affordable yet having a great reputation/positive reviews among professional recording engineers and the community. You really do not need to save a thousand dollars just to buy an awesome vocal condenser microphone.
Condenser microphones are further classified into two types: large diaphragm and small Diaphragm. For vocal studio applications, it is much preferred to use large diaphragm type microphone because of its natural deep recorded sound, low noise and strong output (thus needing less gain and less pre-amp work). This is important for proper gain staging.
Below are the recommended lists of quality but cheap microphones suitable for studio applications (arrange from the cheapest):


Price: Around $60
This is a large diaphragm condenser microphone which is ideal for vocal applications. A lot of positive reviews about this microphone because of its high price to performance ratio.

Price: Around $70
This another quality large diaphragm condenser microphone with price below $100. This needs phantom power of 35Volts- 52 Volts.

Price: Around $120
This microphone has low noise floor and has very wide frequency response. When used with vocals, it is best to sing at least 1 feet to 2 feet away from the microphone.

Price: Around $120
This microphone is voted as the best large condenser mic around $100 by studio-central.com poll.

Price: Around $120
Since this is general purpose microphone, it can also be used to mike drum overheads, guitars and of course vocals. This is one of best high-value true condenser microphones on the market today.

Price: Around $150
Aside from recording vocals, this microphone can also be used to record guitars. You can place this mic in front of guitar amps for example.

Price: Around $180
This microphone is equipped wih FET preamplifier to give the best vocal response as possible.
Since this mic is a large diaphragm; it will be able to capture low frequency response better than small diaphragm microphones. And will be able to capture vocals in a more sensitive mannel.

Price: Around $230
Includes Premium Shock Mount, Pop Filter. This microphone is voted as the best all-purpose condenser microphone around $200 by Studio central forums.
Condenser microphone gears: Condenser microphones require phantom power which is essentially a DC voltage that needs to power up the microphone pre-amplifier unit. The standard phantom power is +48 volts which is also supported by most mixers (provided the mixer includes phantom power features) and professional recording audio interface where you will connect these microphones.
Most modern mixers even the small and inexpensive one for home studio applications such as Behringer Xenyx 502
However, the most commonly gear to power up the condenser microphone is with an external audio interface (either Firewire or USB). Modern audio interface includes a phantom power unit. So you will simply connect your condenser microphone to the audio interface and then switch on the phantom power button. If you do not have an audio interface, you should have one. You can read this post on the cheapest 24-bit/96KHz USB Audio Interface. You can also read this tips on buying an audio interface.
To connect your condenser microphone to a mixer or audio interface with phantom power; follow the steps below:
1.) Turn off or mute your studio monitor.
2.) Turn off or mute your audio interface.
3.) Connect your condenser microphone to the mixer microphone XLR input. See some tips here.
In audio interface, you need to use the XLR output of the condenser microphone and connect it to the XLR preamp input of your audio interface. Be sure to check the impedance of your input devices (such as the audio interface) and observe proper microphone impedance matching to get the best recording signal.
4.) Turn on your mixer
5.) Turn on/switch on any phantom power switch.
6.) Turn on your studio monitor.
7.) Test your condenser microphone and adjust microphone levels.
Another important requirement is to have pop screen and the shock mount when using condenser microphones for vocals. This is because these microphones are very sensitive to high frequency “…shhh” sounds from the vocals. These pop screen filters will do the job of minimizing these effects. The shock mount will be used to hold the condenser microphones. When buying microphones, it would be nice the price package you’ve paid already include these microphone gears. These parts will look like below:

Condenser microphones with pop filter and shock mount
Beginner information about dynamic and condenser microphones
Remember there are two types of microphones targeting a bit of different applications:
1.) Dynamic microphones – the most common type of microphones we see. It is used as a vocal microphone for most live performances especially that the most popular dynamic microphones for vocals is Shure SM58LC Cardioid Dynamic Microphone.The cost of purchasing dynamic microphones is affordable with respect to typical home studio applications.

Dynamic microphone sample picture
You can purchase a very good dynamic microphone for vocal studio applications as low as $30. If you need to know about typical technical specifications for SM 58, you can read it here:
http://www.shure.com/proaudio/products/wiredmicrophones/us_pro_sm58-cn_content
2.) Condenser microphones – this is an ultra-sensitive microphone commonly used for professional studio applications, commonly found in big and professional A class studios. Typical condenser microphones cost a lot, a vintage Neumann U47 cost around $5500. A much more practical and affordable is Neumann TLM 49 Condenser Studio Microphone which you can buy at Amazon for $1300. You can find some important information about this condenser microphone here: http://www.recording-microphones.co.uk/Neumann-U47-tube.shtml and also here for Neumann TLM 49. These microphones are optimized for vocal recording.
Of course, they have superb reception and frequency response. But one downside is that they are too expensive as beginning gears for any home studio producers. A solution that balances cost and benefit is necessary (more details below).
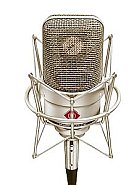
Condenser microphone picture
Is there really a substantial difference between dynamic and condenser microphones? You can hardly tell. Listen to the following produced songs below, all recorded using SM 58:
Sample #1:
Sample #2:
The lessons here is that if you do have the budget and a long term plan building a professional recording studio aiming to get several clients, you need a condenser microphone. If you are just working in your home recording studio with an extremely limited budget while still aiming to produce your first demo, you can just purchase SM-58 and this will get the job pretty well done.
Microphones for recording drums
If you are planning to record drums in your home recording studio; then you need a lot of microphones. For recording drums, it requires at most 3 microphones to sufficient capture the most important drum kit sound. Although with much patience and advantage in room acoustic environment, you can perform recording & mixing drums using only two microphones and still have a great drum sound.
For three-microphone setup, you need:
1.) One microphone (preferably SM57) for snare.
2.) One kick drum microphone (preferably Audix D6


3.) One overhead microphone (condenser microphone, it can be Rode NT1A).
There are more elaborate methods on putting microphones on drums such as this method on recording drums with 4 mics but you can start with just two or three microphones.
Total Microphones you need to purchase
So based on the above discussions; how many microphones do you really need to purchase? OK let’s break down into a summary with the following assumptions:
Situation A: Recording band live (one vocal, one guitar, one drums, one bass; assuming guitars and bass are recorded via amp)
a.) Two Rode NT1A(One for vocal recording and one for drum overheads)
b.) Two SM57 (one for guitar amplifier and one for snare drum)
c.) Two Audix D6 (one for bass guitar and one for kick drum)
Note: Audix D6 is suitable for very low end bass. If the bass guitar track is somewhat targeting more middle frequencies (such as a bass guitar solo), you might want to pair it with SM57.
Total: 6 microphones needed.
Situation B. Recording band one at a time- drum kit first
a.) One Rode NT1A – shared with drum overheads and vocals
b.) One SM57 – shared with snare drum and guitar amplifer cabinets
c.) One Audix D6 – sharing with bass guitar or kick drums.
Total: 3 microphones needed
Situation C. Singer-songwriter interested in recording vocals and acoustic guitar only
a.) One Rode NT1A – for live recording of acoustic guitar and vocals.
Total: only one microphone needed
Situation D. Recording band live with guitars and basses DI directly into audio interface (no using of amp cabinet)
a.) Two Rode NT1 for drum overheads and vocals
b.) One SM57 – for snare drum
c.) One audix D6 for kick drums
Total: 4 microphones needed
Situation E. Vocalist interested only in live vocal recording
One SM58 microphone needed.
IMPORTANT NOTE: Some situations discussed on the above setup assumes you would only be using one microphone pointing to the guitar amp at any time. In some guitar recording techniques, there are two microphones used. Therefore you need more microphones than what is recommended.
To save the number of microphones, you might want to record the guitars and bass either as DI or use only one microphone per amp. Then you will be recording overdubs for guitars to further thicken the guitar sound.
Content last updated on October 15, 2012