
If you want the best quality out of your audio CD music project, then you need to know these important do’s and don’ts of burning music into a CD. This is typically helpful for self-produced musicians that are producing their own music at home. And you would like to create a CD that would be distributed for sale in gigs and independent store outlets.
Importance of audio mastering
DON’T burn created music into a CD that does not undergo an audio mastering process. Take note that this is only applicable if you are the one creating the sound recording and mixing of the song.
DO prepare your music to have that broadcast quality sound, format and optimum loudness before finally burning it into a CD. This is only possible through an audio mastering process.
Audio mastering is a process of conditioning your finished mix/recording so that it will have attained the optimum loudness, sonic characteristics and format appropriate for distribution and broadcasting.
The recommendation is to have your mix professionally mastered before you will be burning it into a CD. You can find a lot of quality mastering engineers in this Gearslutz forum. You can also read this tutorial on characterizing a professionally mastered CD.
Importance of using high quality audio resolution
DON’T burn mp3 format into an audio CD if you want the best quality results.
DO use only the original 16-bit/44.1KHz stereo WAV format as a source when creating an audio CD.
MP3 can be used to create an audio CD. But if you want the best audio quality, you should only burn the 16-bit/44.1KHz stereo WAV version of the song and not the MP3 version.
The primary reason is that MP3 is a lossy format; it is already compressed and won’t sound as good as the lossless WAV file. Bear in mind that you also don’t get the sound quality benefit if you are converting MP3 to WAV first before burning into a CD. It is because your audio source is already in lossy format. There is no way to make it sound like the original wav file except to rip the song from the original artist album CD.
Importance of ripping high quality wav file as a source file to another CD project
DON’T ripped audio CD tracks as MP3 (or to other lossy audio file formats), if you want to use this audio file as one of the tracks in creating another audio CD.
DO only ripped audio CD tracks in 16-bit/44.1KHz stereo WAV file format.
If you are compiling music into a CD for personal purposes and then you want the best sounding audio CD compilation. You need to have the entire original WAV version (in 16-bit/44.1KHz stereo WAV) of the songs that you will add to your CD project. This high quality WAV file can only found in the official artist CD album and not in the downloaded MP3 version you bought in iTunes or somewhere else.
The process can be done as follows:
Official CD album of the recording artist — > Rip song from CD (example using Windows media player) — > 16-bits/44.1KHz stereo WAV format — > Burn to another CD project
Make sure you configure your CD ripping software to extract the audio tracks as lossless WAV. See screenshot below on how to do this in Windows Media Player:

Lossless wav ripping
Significance of CD burning speed
DON’T burn at the fastest CD writing speed supported by your CD/DVD drive.
DO burn at 4X to 10X speed – the slower the better with 4X as the optimum.
CD burning/writing is a process of writing digital data from your computer hard drive to the blank CD-R in your optical drive. The primary reason why you should not be writing at the fastest burning speed is to reduce errors in the process. This can affect the resulting audio quality of the CD project.
Critical audio CD projects such as those in the major and independent labels album project are typically burn at a slow CD writing speed of 4X. This will produce an error-free CD master. This will be used in the CD replication process to mass-produced CD’s for distribution. Whatever CD writing software or optical drive you are using; set them at 4X (recommended) to 10X (maximum).
For details on this topic, refer to this post CD burner/writer & media for burning audio mastering CD
Importance of quality CD-R
DON’T burn your music into a cheap and poor quality blank CD-R, if you want to last your CD in a longer period.
DO use only high quality CD-R.
Once your digital audio data are burn into the CD-R; the reliability depends on the quality of the CD-R you are using. The most recommended CD-R brand is Taiyo Yuden and TDK. It is because they are known for their very low error bit rate and reliability that is tested to last more than 100 years.
Relevance of Disc burning mode
DON’T burn your CD using “track at once mode” if you are submitting your master for CD replication or distribution.
DO burn your audio CD always in “disc-at-once-mode (DAO)”.
You can easily set this in your CD writing software. This mode ensures compatibility with the CD replication process.
CD-R vs CD-RW
DON’T use CD-rewritable disc when burning music for distribution and album release/CD master.
DO use only high quality CD-R
Music for distribution is meant to be permanent, so you should not be using CD-RW or rewritable discs. If you are submitting CD-RW for duplication or replication; it will be rejected by the replicating plant. It is recommended that you should only be using the highest quality CD-R for your CD project.
Red book CD specifications
DON’T create a CD master if you don’t know about Red book specifications.
DO make sure that your CD master (that contains your music for distribution) is following the Red book specifications.
Audio CD used in commercial releases does follow a certain specification/standard known as the “Red Book”. The purpose of this standard is to create CD that will be compatible with all CD players.
One of the simplest solutions in creating a red book audio CD is to use a CD writing software such as Sony CD Architect. This software fully supports red book specifications. Check out this tutorial on how to make a CD master that complies with Red Book standard.
Importance of CD verification
DON’T burn CD without verification after the writing process.
DO ensure that your CD is verified after the CD burning process.
It’s always the best practice to verify your CD after the burning process. This will ensure that your CD is clean and free of errors.
CD capacity
DON’T exceed the audio CD capacity.
DO gives some allowance in your CD and ensure that the total playing time of the CD is less than 79 minutes.
This is in relation to the red book audio CD specifications. This one of the requirement that CD playing time should not exceed around 79 minutes. Also don’t burn a CD that exceeds the full capacity; you will know this very easily using your CD writing software.
Tips: Burning an Audio Mixing Session to a CD
Question from a reader:
I’m taking a class and I’ve received a session to mix. Every time I burn the wav files using windows media player turns it to regular audio. The problem with that; it loads as audio so it’s a stereo file, can’t get around that. A single kick would load on track 1 and 2. Explain to me when I burn wav files to disc it stays as a wav file. I’m using windows vista.
Potential Issues
a.) Your CD burning software (Windows media player) creates an audio CD. This would automatically mean that even if the audio is mono (as what most tracks for mixing are) it would automatically be converted to stereo.
b.) If you burn the recorded tracks to audio CD, it would lose its original recording resolution since audio CD always has a 16-bit/44.1KHz. Most recording are done at a higher resolution such as 24-bit/48KHz.
Potential Solution
a.) Some CD burning software (like Nero) does include a data disc feature. In this case, you can burn the recorded tracks in its original form and they are not converted to audio CD format (16-bit/44.1KHz).
b.) If you want an open source solution, you can use Infra-recorder.
Then create a data disc. Since most mixing session file are rather big in file sizes, I would recommend creating a DVD Data Disc using Infra Recorder; see screenshot below:
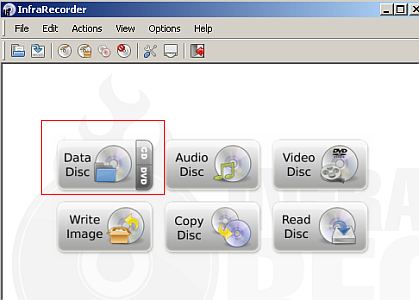
Creating a Data CD
Simply click the DVD button in the data disc options.
c.) Bear in mind that since this is now a data disc, it cannot be played in CD players, etc. To get the data from the disc, put it in your computer DVD drive and simply copy the files to your DAW hard drive; that’s it. The sampling rate, bit depth, etc would be preserved and the same as the recorded files (they are not altered during the CD burning process.)
Content last updated on October 8, 2012