
Have you ever examined a professional mastered CD loaded directly to an audio software editor? By examining how it exactly looks like and by characterization; you can obtain a lot of information as to how a professional mastered CD is done.
If you are doing your own DIY mastering, this information can be of great help. Let’s take a close look.
The process of CD audio extraction
The first step is to extract the entire audio contents in the CD and then load it to your audio software editor. There is a lot of software that includes the CD extraction feature. In this tutorial Adobe Audition 1.5 will be used. Here are the steps:
1.) Place the CD audio inside your computer DVD/CD drive. Make sure that the CD album is original and the one you bought at the record stores. This will ensure the CD comes from professional mastering facility.
2.) Launch your audio software editor (in this example Adobe Audition 1.5).
3.) Then go to File – Extract Audio from CD. Then the following settings are important (it depends on your CD audio extraction software).
a.) Interface options – select ASPI/MMC Read CD – this is how Adobe Audition or your CD extraction software should read the CD audio.
b.) Set a buffer size of around 16KB and try fastest extraction speed first – if there are errors in the CD extraction, try a lower extraction speed.
c.) You need to extract the entire album songs to a single waveform.
d.) Set the error correction to CDDA accurate.
This is how the CD extraction would look like:
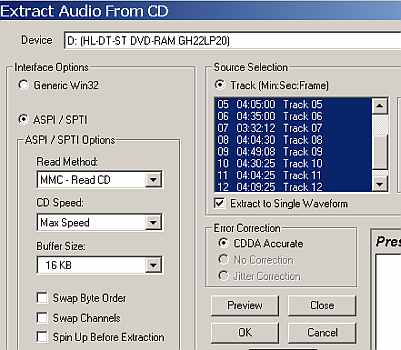
CD extract options
4.) Finally click OK to start extracting the audio contents. It can take time. Make sure it will not be interrupted or else the content would be corrupted. Refrain from doing other CPU intensive and memory tasks in your computer to make sure that the extraction error free.
Loading the Mastered Waveform
Once the extraction is complete, the entire songs would be extracted to a single waveform. The reason why you should be extracting the entire album into a single waveform is for you to see how the songs waveforms are being arranged. You can also examine how much is the gap or silence per song or any other important parameters which you will be examining later.
This is how the waveform would look like:
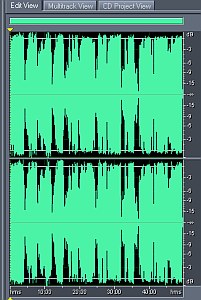
mastered single waveform
Two obvious things:
1.) The waveform looks “loud” peaking near zero dB scale simply because it’s already mastered.
2.) There are peaks and valleys on the waveform. These are the songs separated by silence or gaps.
Characterization of Mastered CD in Details
1.) A 0.5 to 0.8 second silence from the start of the CD (to the first song of the album)

CD length at the start
This is usually set by the mastering engineer and not dictated by the red book CD standard. The silence before any song would start. More details later.
2.) 3 second total silence/ gap per song. But in the tutorial how to make a CD master that complies with red book CD audio standard; there is a 2 second minimum gap in between songs. So this extra one second is a combined silence between the ending of the song and the silence before the start of any song. You can picture it this way:
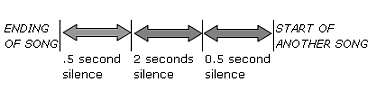
break down of gaps
The above screenshot assumes that the mastering engineer leaves a 0.5 second gap after the end and the start of any song. Thus:
0.5 second gap before song starts + 0.5 second gap after the end of the song + 2 seconds red book audio CD gap(added by CD burning software which is red book compliant) = 3 seconds
3.) A 5-second gap after the end of the last song in the album.
5 second gap at song end
4.) This is the volume statistics of the mastered CD:

waveform statistics
The following are some interesting information based on the volume statistics data.
a.) The average RMS level of the entire songs in the album is only around -17.5dB. Now comparing this to modern CD, this is very low. But this album is done mostly from the 80’s with some songs released in the 90’s.
b.) The actual bit depth is 16-bit and are two channel tracks, implying stereo.
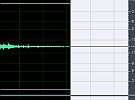
c.) Also the peak amplitude is 0dB; this means the entire dynamic range of the CD has been fully utilized. Since 0dB is the maximum digital peak, while the average RMS is way down at -17.5 dB, implies also that this album is not participating the infamous loudness wars and that it contains a lot of nice sounding dynamics. Below is a sample snapshot of one of the album songs showing the high and low peaks indicating high dynamics.
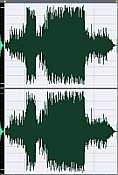
nice dynamics of the song
Content last updated on July 26, 2012