
This is a complete tutorial on how to get your Focusrite Saffire Pro 40 to work in Ubuntu 11.10. At the end of this tutorial, you should be able to record and play with this Firewire audio interface in Linux/Ubuntu 11.10.
Before proceeding with the steps below, make sure you have connected the Firewire cable from Saffire pro 40 to your computer. Only connect the Firewire cable when your system and your audio interface are entirely off (not powered).
After connecting Saffire Pro 40 Firewire cable, connect your studio/nearfield monitors to the audio interface. This would allow you to monitor the results of your recording. For details; refer to the audio interface manual for guidelines on connecting this hardware to your computer.
Once everything has been connected, boot to Ubuntu. Follow the steps below.
Install the Required Packages
1.) Make sure your system is fully updated. Run this command below to fully upgrade your system:
$ sudo apt-get update
$ sudo apt-get upgrade
2.) Once your system is fully updated. Install Synaptic package manager by going to Ubuntu software Center – then type in the search box, “Synaptic
Package manager”.
3.) Go to your Dash home. In the search box, type “Synaptic Package Manager”. Click to launch it. Enter your Ubuntu password.
VERY IMPORTANT: If you have previously installed JACK and FFADO using subversion or source code compilation (not using Synaptic or Ubuntu software manager), you need to remove that first. Follow the uninstallation procedures of FFADO and JACK.
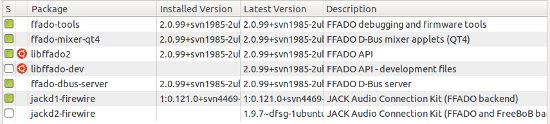
4.) In the quick filter, type “ffado”. Install the following packages as shown in the screenshot below. (Green marks are installed packages; they are required for any Firewire audio interface to work).
FFADO synaptic
Make sure the following are installed (also enable real-time priority for JACK):
a.) ffado-tools
b.) ffado-mixer-qt4
c.) libffado2
d.) ffado-dbus-server
e.) jackd1-firewire
In addition, some packages installed by bulk (several packages installed together). For example, installing the ffado mixer would also automatically install libffado, etc. Another example is that installing the jackd1-firewire would also install all required jackd components such as shown below.

jackd component installed
These are:
a.) jackd
b.) jackd1
For Firewire related packages, confirm that the following packages are also installed:
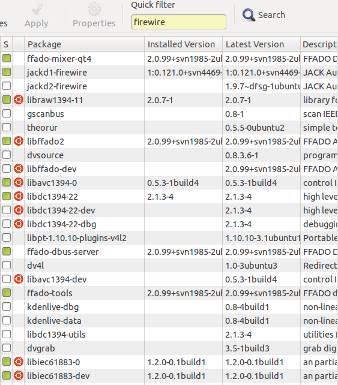
Firewire related packages
Be sure to match those with green marks above with the one in your synaptic package manager. If something is not still installed, go ahead and install that first. These are the most important:
Legend:
*** – already installed previously
a.) ffado-mixer-qt4 (***)
b.) jack1-firewire (***)
c.) libraw1394-11
d.) libffado2 (***)
e.) libavc1394-0
f.) libdc1394-22
g.) ffado-dbus-server (***)
h.) ffado-tools (***)
I.) libiec61883-0
j.) libiec61883-dev
5.) After completing the above installation, you need to install Ardour which is the default digital audio workstation for Linux. Simply go to Ubuntu software center and install it. Only Ardour should be installed; since JACK and Real time configuration has already been completed earlier.
Configuration Steps on using Saffire Pro 40
Now that all important packages/software are installed; let’s test the installation. Follow the step by step procedures below carefully:
1.) Switch on Saffire Pro 40 as well as the studio monitors. When the audio interface is now powered; restart Ubuntu. After the restart, you need to make sure that the system recognizes your audio interface and you have the permission to use it. Follow steps 14, 15 and 16 in this tutorial to install FFADO & JACK from Source using Subversion in Ubuntu 11.10.
Do not proceed with Step2 below if the above steps are not perfectly complied.
2.) Launch terminal (Control-Alt-t), run FFADO DBUS server. Command below:
$ ffado-dbus-server
When it’s running; do not close the terminal window. You should be able to see “DBUS service running”. If you take a look at the executed lines, you should see the inputs and outputs of Saffire Pro 40 get recognized.
3.) Launch another terminal and run the FFADO mixer. Command:
$ ffado-mixer
If all is well, you should be able to see your Saffire Pro 40 mixer control panel that is similar to the one in Windows operating system. Feel free to submit the usage report to FFADO. This is how it looks like:

Saffire pro 40 FFADO mixer
You do not need to touch or edit any of the Saffire Pro 40 mixer configurations. Leave it with default settings for this test.
4.) Launch another terminal again and run JACK using qjackctl:
$ qjackctl
Configure JACK for Saffire Pro 40 by clicking “Setup”. Configure as shown below (make sure the driver is set to Firewire and set other parameters with the values shown below):
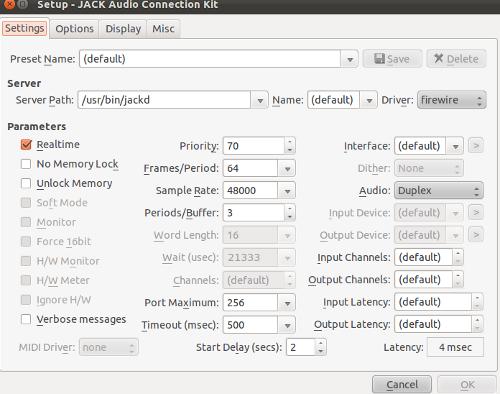
qjackctl configuration
As you can see the latency provided is 4ms which is OK. Press OK to save the changes.
5.) Hit “Start” on JACK. There should be no errors. For the first time, the “FW active” LED on your Saffire Pro 40 hardware would emit a green light; indicating a successful Firewire communication between the hardware and your computer. This is the JACK screenshot showing it is started:
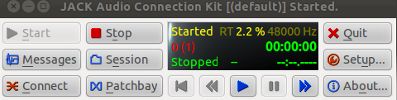
JACK enabled for Saffire Pro40
6.) Let’s do a test recording. Plug a musical instrument (acoustic guitar for example) to Input 1 of your Saffire Pro 40 and set the gain knob to around 30% to 50% of the maximum. Click the “Inst” button also on Input 1. Play the guitar and you should see the Input 1 level meters moving in response to the received audio signal from your instrument.
7.) Launch Ardour and let’s do a test recording. In New Session, assign a name e.g. “test”. Then click “New”. There might be some warning errors like ALSA driver not found, just ignore and close them.
8.) Go to Track – Add Track/Bus – select “1”, “Tracks” and “Mono” as well as “Normal” for “Track Mode” then click “Add”. This track would be named “Audio1” by default.
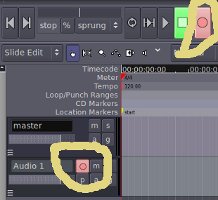
9.) Hit both the record button of the added track as well as master record button. See below (enclosed in yellow):
Saffire Pro 40 recording with Ardour
The master record button would then blink.
10.) To start recording, hit the play button. Play your guitar and the waveforms would then start to appear on Ardour. See below:
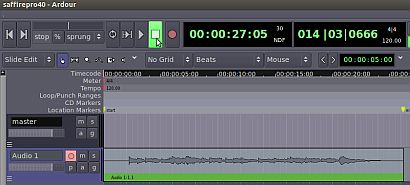
Recorded waveforms
Below is a sample recording made with Saffire Pro 40 in Ardour using Ubuntu 11.10:
If you encounter some installation and configuration issues , leave a comment below.
Content last updated on June 29, 2012