
This is a tutorial on how to use and understand the Focusrite Saffire Pro 40 from a user perspective. Take note that this tutorial can be applied to other Focusrite audio interfaces because they have similar mix control layouts and features. How to get the mix control?
By default, mix control is available after complete installation of the Focusrite drivers. The drivers are usually installed before you will be hooking Saffire Pro40 to your computer firewire port. This is a standard procedure to prevent malfunction, damage or abnormal operation of your audio interface. First, you need to fully install Saffire Pro 40 in your computer. If you have already installed Saffire Pro 40, you can go directly to the mix control tutorial section.
Install Focusrite Saffire Pro40 Firewire Audio Interface
This tutorial lists the actual events for installation and configuration of Focusrite Saffire Pro40 in Windows XP operating system Service Pack 3.
Your Computer should have a Firewire Port
Initially my computer did not have a Firewire port. It is an old motherboard using Asus socket 478 technology. Since Focusrite Saffire Pro40 requires a Firewire port on the computer, I purchase a PCI Firewire card such as this one:
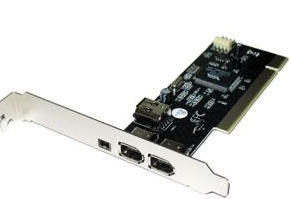
firewire card PCI
Image credits: CD-R king
I then install this card in one of the available PCI slots. I boot and automatically Windows XP recognizes the hardware and automatically install the necessary Firewire drivers. I confirmed this by going to Start – Run and then typing devmgmt.msc. This is the shortcut to the Windows device manager. In there, I can see that the Firewire has been installed and working (see IEEE 1394 Bus controllers).
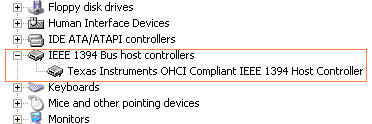
IEEE 1394 installed
The Firewire chip is actually made from Texas Instruments which is one of the recommended Firewire chips by Focusrite.
It is important to use the recommended chips to avoid incompatibility issues. On the other hand, if you have a laptop check if you have a built in Firewire port. If not make sure the laptops’ comes with a PCMCIA slot, and then buy a Firewire express card. Most netbooks (those with around 10 inches screen) today are not equipped with an additional PCMCIA slot.
Uninstall Existing WDM-Based Soundcard
Currently I have an Audigy 2ZS soundcard, so I uninstalled it using the procedure below:
1.) Go to Start –Control Panel – Add or Remove Programs.
2.) I select “Soundblaster Audigy” then proceed to uninstall this software driver. I also uninstall the entire Creative Software bundle. Just select “restart later” when all software uninstallation are complete.
3.) When all drivers and software are uninstalled, shutdown your computer. Open the case and remove the PCI soundcard device. Be careful when removing the PCI soundcard because it can affect other devices installed.
4.) After removing the PCI device from the motherboard, boot into Windows XP and pause into the motherboard bios. You need to disable the onboard audio device. For details, please refer to your motherboard manual.
5.) Finally after booting into Windows, there is no other WDM audio device running. Saffire pro 40 is based on ASIO which offers a lower latency when monitoring and recording. Read this post illustrating the differences between ASIO and WDM.
Install the Saffire Pro 40 Drivers
Finally refer to the steps below:
1.) Do not yet connect your Saffire Pro40 via the Firewire slot of your computer.
2.) Insert the installer CD and run the installer to proceed with installation of the drivers. After confirming successful installation, shut down your computer.
3) Connect the Saffire Pro40 to your computer Firewire slot. Make sure your computer is turned off while doing this. Connect your nearfield monitors to the balance main monitor mix outputs at the back of the audio interface. See screenshot guide below:
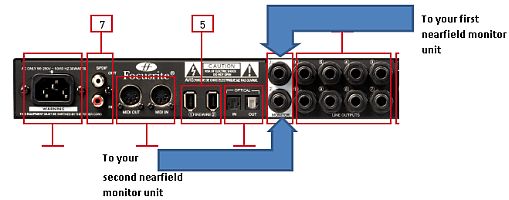
connecting saffire pro 40 to nearfield monitors
4.) Power on your Saffire pro40 as well as your nearfield monitors (but don’t switch the volume to maximum).
5.) Power on your computer, it should now recognize the Saffire pro 40 as the sound device in both playback and recording of your Windows computer.
6.) Shutdown your computer and turn off Saffire Pro40.
7.) Reboot while the audio interface is off. Go to this page.
Download the latest Saffire Mix Control versions. For example as of October 2011, the latest version is version 2.4. After downloading, install this one in your computer. Reboot after installation.
8.) While rebooting, turn on your Saffire Pro 40. After reboot, you can access the audio interface using the latest mix control software. Try to play a sample MP3 using the Windows media player, you should be able to hear music coming out of your nearfield monitors. If you adjust the monitor level control directly on the Saffire Pro 40 hardware, you should also observe a change in the nearfield monitor volume level output.
9.) You can then configure your DAW to use Saffire Pro 40 as the recording and playback device.
An alternative Installation Step
1.) Download the latest mix control software first and install it while Saffire pro is still not connected and the drivers are not installed.
2.) Shut down your computer.
3.) Connect Saffire Pro 40 to your computer Firewire slot. Also connect the nearfield monitors to the audio interface. Refer to details in the previous section on how to connect your nearfield to Saffire Pro 40.
4.) Power on your Saffire pro 40.
5.) Power on your computer and while rebooting insert the installer CD.
6.) After successful booting into Windows XP, the operating system will recognize the connected Saffire pro 40 then click on it.
7.) You will then see the Found new hardware wizard:

xp new hardware wizard
8.) Select “No, not this time” for “Can Windows connect to Windows update to search for software” then click next.
9.) If you see the message “If your hardware came with an installation CD or floppy disk, insert it now”; select “Install the software automatically (Recommended)”.
10.) Windows will then load and install the drivers automatically found in the installer CD. The hardware is then ready to use.
11.) Reboot the computer with Saffire Pro 40 connected to Firewire
12.) After rebooting, open your DAW and configure it to use Saffire Pro 40 as the audio device. Test your audio interface by playing some songs using Windows media player.
Learning and Getting Started with Saffire Pro40 Mix Control
After doing a computer reboot, you can access the mix control in Windows by going to Start — > All Programs — > Focusrite — > Saffire MixControl, then click the Mix Control launcher. It should exactly look like the one below:

Saffire Pro 40 mix control
The mixcontrol is the heart of your Saffire Pro 40 operations. It commands the hardware inputs and outputs of your audio interface. The mixcontrol is a very powerful tool that you can use whether you want to use the audio interface in live venue or inside your recording studio.
Below are the most important features that you can adjust:
1.) Sample rate – this can only be adjusted if the audio interface is not currently in use or streamed by any ASIO applications.
For example if you are currently running projects in REAPER digital audio workstation, you need to close this project first and exit REAPER. Then in the mix control you can then change the sample rate, by moving your mouse cursor to the drop down.
The following are the options:
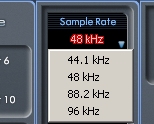
Sample rate
There are 4 ways you can adjust the sample rate and these are: 44.1 KHz, 48 KHz, 88.2 KHz and 96 KHz. Most recording applications for TV and film would be using 48 KHz as the sample rate. 44.1 KHz is sufficient for most audio recording applications.
96 KHz is for high-fidelity recording and suitable for any high-end applications. Take note that recording using this sample rate would be consuming a lot of disk space.
It would be surprising that you do not see options for bit depth. By default, professional recording interface such as Saffire Pro 40 would be using 24-bits. But if you would like to select different recording bit depths; it would now be done in your DAW software.
2.) Sync source – digital data needs synchronization methods. This is usually the clock source. The normal operation is to set this to internal. This means there are no digital inputs connected to Saffire pro 40. Digital inputs are usually SPDIF or ADAT. Make sure you set the correct sync source if you are connecting digital inputs.
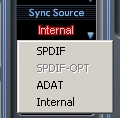
Sync Source
3.) Settings – this is where you can find the advanced settings for your audio interface. See screenshot below:
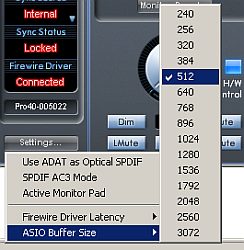
Saffire Pro 40 detailed settings
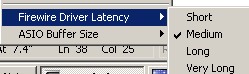
Driver latency and buffer size settings
For most of the time, you would not need to deal with these settings. The default settings work out fine after installation. For example, there is no latency, drop out and pops/click issues using the ASIO buffer size of 512 and driver latency of medium.
Bear in mind that this depends on the power of your computer hardware, the quality of your DAW and the optimization of your PC for audio. The settings above don’t have any problems with REAPER for both playback and recording in an optimized environment. For details about optimizing PC for audio, Firewire and USB, you can refer to the following tutorials below:
Windows XP/7 Audio Recording DAW Tweaks & Optimization Tips
Optimize Windows XP for Firewire &USB Audio Interface during Recording
Audio Dropout and MultiTrack Recording Latency Troubleshooting Guide
The following are the rules for changing the buffer size and latency in Saffire MixControl:
a.) If you are experiencing latency issues (high latency values reported by your DAW), try setting a small buffer size. Careful about setting too small buffer size in an under-powered CPU because this would result to audible pops or clicks.
For most recording applications, 11ms to 19ms latency is OK. This is measured by most DAW such as in Reaper, see below:
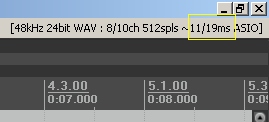
Reaper latency
b.) If you are experiencing pops and clicks, try setting a higher buffer size. Although this will solve the pops and clicks, setting too high buffer size would increase the latency which is also not good for playback and recording.
It is why the optimal settings is somewhere in the middle. In the above Saffire Pro 40 settings, the system set it to:
Latency: Medium
Buffer size: 512
Recommended MixControl Settings
Supposing you are using the audio interface for multi-purpose applications such as recording, monitoring, in the box mixing (within your DAW) and usual Windows audio playback; the most recommended configuration is as follows:
1.) Set the routing preset to “DAW Tracking”.
DAW tracking
DAW1 and DAW2 corresponds to the master LEFT and RIGHT output of your DAW or multimedia player. This will provide the optimum monitoring environment for tracking and mixing.
“DAW Tracking” also works outside professional music production environment in your computer. It is tested to work well if you are listening to music using Windows media player or using your audio interface when watching movies, etc.
2.) If you are recording, you need to use the headphone and turn the main monitor volume of your audio interface to minimum (no volume output to your nearfield/reference monitor). And then you switch the headphone volume to reasonable levels.
There are two headphone outputs available to Saffire Pro 40. By default, these are the following
Line Outputs 7 and 8 – Headphone 1
Line Outputs 9 and 10 – Headphone 2
If you encounter some issues like no headphone output or volume; something is not set right on the headphone monitor output settings. Look for an example below on how to resolve this:
a.) Look at the monitor preset buttons, see below:
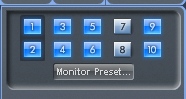
Monitor output
Saffire Pro 40 has 10 analog outputs. In the above screenshot line output 7 and 8 has been marked gray. This means they are switch on and activated to loud volume. However outputs 9 and 10 is not activated and there will be no sound from headphone #2.
First, you need to examine if the routing is done right. See below:

Saffire pro 40 headphone outputs
It says that Line output 7 and 8 are routed to received DAW 1 and DAW 2 which is correct. Output 9 and 10 is also routed correctly. If there is no headphone output volume to Headphone #2, then you activate Line output 9 and 10 in the monitor preset buttons.
To do this, you will simply press shift – LEFT click to button 9 and then 10. It will change the color of the buttons to gray:
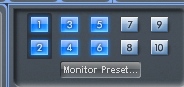
Headphone outputs
Once the headphone outputs are activated (7,8,9,10); you can use the headphone outputs when monitoring during the recording session.
Content last updated on July 23, 2012