
This is a tutorial on how to add, install and use plugins in Ardour using Linux. Plugins are highly valuable anytime you do audio mixing and mastering work. Example of plugins can be reverb, EQ, compressors, etc.
Install Ardour first
This is tested to work in Ubuntu Lucid Lynx and Ardour 2.8.6. If you still have not installed Ardour, then follow the steps below:
1.) First, make sure your Ubuntu distribution is updated. In Ubuntu, go to System – Administration – Update manager, make sure it says “Your system is up to date”.
2.) Install “jackd” first, these are low latency audio tools very useful for recording. Go to System—Administration–Synaptic Package Manager. In the newly released distribution of Linux, it does not anymore include Synaptic Manager. But there should be a tool for managing installed software. For example in Ubuntu, this is called Ubuntu Software manager.
Login using your root Linux password. Under quick search, type jackd
3.) Check “jackd” and then click “mark for installation” , there are other dependent packages to be installed so just click “Mark” as well. To install these packages, click “Apply” in the Synaptic package manager menu. If it ask “Apply the following changes”? Click Apply.
4.) If it ask enable jackd for realtime process priority? Check yes and click “Forward”. After installation it will be marked with green marks beside them. Make sure jackd, jackd-firewire, and qjackctl are green marks.
In the modern installation of Ardour particularly with the latest Ubuntu distributions, it will automatically configure for real time implementation of Jack. You simply need to press “Forward” to install.
But you can always confirm by going to Places—Computer—File System–etc–security–limits.d. Make sure there is a file there called “audio.conf” with the contents below:
@audio – rtprio 99
@audio – memlock unlimited
#@audio – nice -19
5.) You need to confirm that you have added your username to the @audio group. Go to System—Administration—Click “Manage Groups”. Click “audio” group under “Group settings”, then click “Properties”. Under “Group members”, check your Ubuntu username and click OK. Verify by entering your root Linux password. Then close all windows.
6.) Logout to your username and login again (not restart or reboot just click Logout).
7.) After logging back in, Go to Applications – Ubuntu Software – and in the search box , type “Ardour”. When you see “Ardour GTK2”, click “Install” then proceed by entering your Linux password to authenticate.
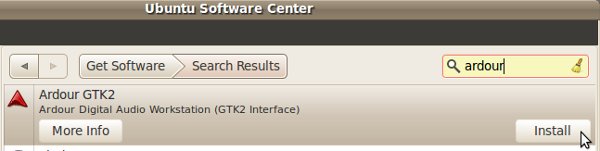
Ardour in Ubuntu software
8.) Try starting Jack first before starting Ardour. It is because Ardour depends on JACK. Enter the command in the terminal: qjackctl. For details, read this tutorial:
How to Set your Firewire Audio Interface as Default Sound Device in Linux
And then go to Step 4.c. There is a procedure there on how to start Jack without Xruns.
9.) After installation, launch Ardour by going to Applications –Sound and Video– Ardour GTK2.
10.) Finally click “Start”. You are then ask to start a new session. Select “new session” tab.Type the name of the sesssion example, “sessiontest” . Then for convenience I saved the files to my Ubuntu desktop. Click “New”.
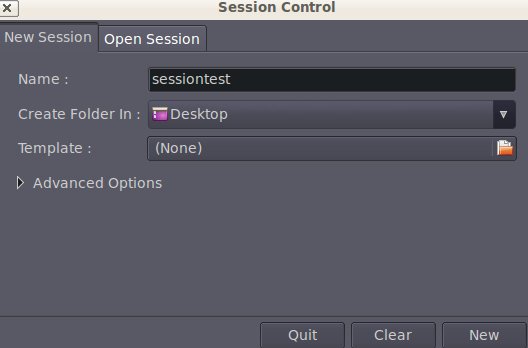
New session
11.) The nice-looking Ardour digital audio workstation environment will then load up, ready to accept tracks for you to record, mix or even master.
Installing Plug-ins in Ardour
To get started, follow the steps below:
1.) You need to install LADSPA first. LADSPA stands for “Linux Audio Developer Simple Plugin”. Go to System – Administration – Synaptic Package Manager. Under “Quick Search”, type “LADSPA”. In the result, look for “swh-plugins”. This is called as Steve Harris’s LADSPA plugins. Proceed to mark it and install.
2.) Now you have installed the plugin. It’s time to add it to Ardour so that you can use it in your projects. Launch Ardour first. Go to Applications – Sound & Video – Ardour GTK2.
3.) Try to create a test project with Ardour and then open it.
4.) Import a sample audio wav file. This will be added to first channel.
5.) Go to Window – Show Mixer. You will see your track in it. See screenshot below:

show mixer
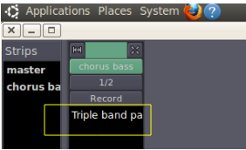
For example in the screenshot, the above track added to the first channel is “chorus bass” and the name of the Ardour project is “mastering”. In the first channel where the first track has been added (e.g. chorus bass); you will see two black areas on the top and bottom. On the top (indicated by yellow arrow), its called the “Pre-fader inserts, sends and plugins”. On the bottom, it is called “Post-fader inserts, sends and plugins”. Ardour works like a software version of real mixing console. If you do not know what are these terms, you should read what are pre-faders, post-faders, inserts and sends.
OK before you can add plugins you should decide if you will add it either in pre-fader or post-fader in that channel/track. This will have a strong impact on the way how you will be handling the tracks. If its added in pre-fader, your fader cannot influence the results of the plug-in. But if the plugin is added in the post-fader, any adjustment in your fader can affect the plug-in.
6.) Supposing you would like to add a plugin in pre-fader region; right click on the black area, then go to “New plugin” – “Plugin Manager”. You will then see all the LADSPA plugins, for example the “Multiband EQ”, “Inverter”, “Flanger”, etc. Supposing you will add a parametric EQ; you can type and search “Parametric” in “Name contains”. And then you will have two choices, namely “Triple band parametric with shelves” and “Single band parametric”.
Supposing you would like to use the triple band parametric EQ: . Click on it and click “Add”. Under “Plugins to be connected”, you will then see “Triple band parametric with shelves”. Finally click “Insert Plugin” to add it to the channel. You will then see the parametric EQ added in the pre-fader section, such as below:
parametric eq added in ardour
7.) Now its added in the pre-fader, you can start adding settings to the plugin. Double click on “Triple band parametric” under Pre-fader and then you will see its settings menu. Implement any settings you like, supposing you would like to apply a low shelf filter significantly cutting the low bass:
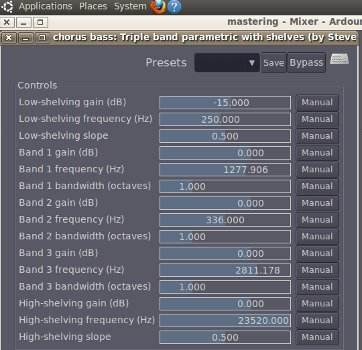
example EQ settings
8.) Close it and then play the audio. You will notice that the EQ settings from the plugin will be implemented in your mix. You can add as many plugins as you want either in pre-fader and post fader by following the steps mentioned in this tutorial. Below are the suggested location for the most commonly used plug-ins:
Time-based plug-ins (preferably added in post-fader)
a.) Reverb
b.) Delay
c.) Echo
Frequency and dynamic range effects (preferably added in pre-fader)
a.) EQ
b.) Compressors
Content last updated on July 21, 2012