
A question from a reader on this blog: “I have recorded live drum using a 4 channel mixer and 4 mics via adobe audition 3.. but the sound is not clear enough… im new to this so plz help me out…..”
Recording Steps
OK, since it looks like you have the correct set of gears and equipments I assume that the problem is on the “technicalities” on how to record drums using 4 microphones. To resolve this aissue you need to learn how to properly track drums in a recording session. The following are the standard steps in tracking drums:
Step1.) You need to setup the drums properly. Make sure that the drums are tuned (for example snare and kick) and ensure that all microphones are fully working as well as the cables. If you have the drummer in the studio, let him play it and adjust so that it will have an optimal tone. Bear in mind that the room and acoustics in your studio can play a great role on the resulting sound of the drums. Of course, if the drummer is not hitting enough then the captured recording will be weak. This does not mean that the drummer should be overly aggressive as this can damage the drum in the long run. The key is to adjust the mixer settings and the recording level so that it will have a well recorded sound.
Step2.) You should have the proper microphones (recommended mics are below):
a.) SM57 for Snare drums.
b.)A mic with good low frequency response for kick drums such as AKG-D112.
c.) Two Cascade Fat head Short ribbon microphone for overheads.
Step3.) Position the four microphones as shown in the screenshot below (microphones are shown inside white circles):
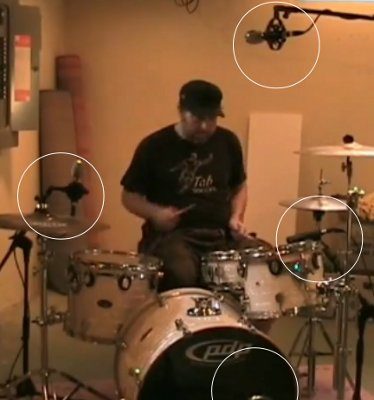
Positioning four microphones on drums
You can experiment based on the initial settings and see what are the best results. Some short tips:
Snare: Put some 2 inches allowance from SM57 from edge of the snare at 45 degrees angle.
Kick drum: A good tip is to place the microphone inside the kick drum by removing the drum head, then put some blanket over it.
Overhead 1 -(near tom) – start positioning at 3 to 6 inches. experiment for best sound.
Overhead 2 -should be at the center of the drums between left and right cymbals pointing downward, tweak this for best sound.
Tip: Do not aim microphones at each other as this will introduce phase cancellation and maybe that would explain why you are not getting clear enough signal.
Step4.) Connect each microphone to one input jack (mono) in the line input in the mixer. All in all you will be using 4 line input jacks on your mixer. See the screenshot below on how you connect the drum microphones to a sample small mixer (shown is Behringer Xenyx 502, but similar features are available in other mixer)):
IMPORTANT: Bear in mind that if you are using microphones with XLR output ,you will be needing a mixer with 4 XLR inputs as well. In this case, you cannot use Xenyx 502 such as the example;that mixer is only used as an illustration.
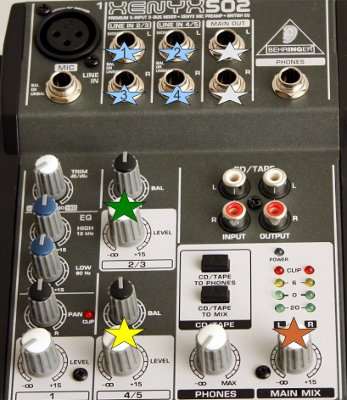
sample mixer
The 4 blue stars are the line inputs where you will need to place the microphone inputs from the drums.
Step5.) Connect your mixer to your computer (either using a sound card or an audio interface will do). To connect to your computer sound card, use both left and right on the main out as shown in the above screenshot (gray star). You might be needing a connector/converter to RCA if the interface/soundcard inputs requires RCA.
Step6.) Check if you are getting the proper recording level. In Adobe audition, you can check it by going to options then “Monitor Record levels” in multitrack. Try hitting the snare or any parts of the drum, the volume meter on Adobe audition should spike high but not too near 0 as it can cause clipping. Make sure you are not recording clipped signals. Try hitting as loud as you can and make sure it did not register a red (clipped) level on volume meter.
Adjustments for better sound
The following are the adjustments you can do :
a.) If the recorded sound is weak, try to increase the line input volume on the mixer shown in green and yellow stars above.
b.) If the sound is still not clear enough, try to increase the “trim” settings a little. This will act as the gain.
c.) Try also adjusting the main mix volume (in orange star).
d.) Finally the volume of your audio interface or sound card.
Try to avoid noise as you increase gain or volume. Do a lot of sound checking covering all your drum parts. Finally recording this type of setup will bounce your entire drum recording into a single stereo track in Adobe Audition. A single stereo track means one left signal and one right signal which is coming from the main output shown in the above screenshot.
If you have a mixer for example with 4 direct outputs and beyond, you can connect them to your 4 input channel sound card or audio interface and then you can individually track drums to Adobe Audition multitrack. With this , it is possible to get Track 1 for snare, Track 2 for kick drums, etc. not just a single stereo wave output from the mixer. As a summary, connect 4 inputs to mixer, then use the 4 direct outputs to connect to your audio interface or soundcard for multi-track drum recording. Look for appropriate mixer that can accept 4 inputs XLR and then output at least 4 direct outputs to your audio interface or computer.
Content last updated on August 22, 2012