
This is a tutorial on how to get started recording musical instruments to your Linux computer using Audacity which is a free recording software. Below are some additional requirements:
1.) Musical instruments with pickups and microphones (dynamic or condenser). Condenser microphone is appropriate for recording vocals while dynamic microphones is more appropriate for recording guitar using an amplifier.
2.) Next thing is you need a USB or Firewire audio interface that is fully supported in Linux. Now this can be tricky to work with especially if you are only a beginner. For example, I have successfully installed Saffire Pro 40 Firewire audio interface in Ubuntu, and the steps can be complex.
Not all professional audio interface are supported by Linux. For details, you need to contact the user support or manufacturer for details.
3.) If you already have a fully working PCI soundcard (not an onboard soundcard!) in Linux, then you can use this for your recording. PCI soundcard is installed by default by common Linux distributions such as Ubuntu unlike the USB or Firewire audio interface.
Example of quality PCI soundcard are those manufactured by Creative Soundblasters and M-audio. Although, these are not professional audio interface designed for serious music production; it is doable for amateur home recording use. The recording quality would still sound great depending on your skills and the quality of your musical instruments/microphones (listen to some audio samples below).
4.) If you decided to use a PCI soundcard, then you need a little outboard mixer that will work as a preamp. Preamp is required to bring the weak instrument level signals from your microphone/instruments to line level signals suitable for recording. A good but inexpensive mixer would be Behringer Xenyx 502

5.) Balanced audio cables (such as XLR male to XLR male) for connecting your musical instruments to the audio mixer.
First install Audacity
Assuming you can play audio through your favorite Linux media player using your installed PCI soundcard, you are now ready to install Audacity. This procedure is written using Ubuntu distribution.
Step1.) Go to Applications — Ubuntu Software Center.
Step2.) In the search box, type audacity.
Screenshot:
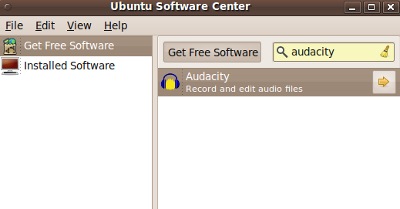
install audacity in ubuntu
Step3.) Click the yellow arrow. You will then see the Audacity information page. Click “Install”. You will be required to type in your Linux password.
Step4.) Audacity installer will then be downloaded and installed automatically to your Linux computer. You will know that it is complete if it is not any more downloading and applying changes and it will go to the view in Step 3.) except that the “Install” word changes to “Remove”. In this case, Audacity has been successfully installed in Ubuntu. Close the Ubuntu software center.
Step5.) Lets launch Audacity for the first time. Go to Applications — Sound & Video — Audacity. A welcome message will pop up, just click OK and check “Don’t show this again at start up”.
Recording Setup
1.) Connect your musical instrument to your outboard mixer. Refer to the following guidelines:
a.) Microphones – use a mic with XLR output and connect it to the XLR microphone input of the mixer. Shown in the screenshot below (yellow box) is the Xenyx 502 preamp mic input:

Xenyx502 preamp input
With this setup, you will get a benefit of balanced connection that is free of noise and interference. For details, you can read this tutorial on balanced vs unbalanced audio.
b.) Acoustic guitars with active pickup – this assumes the guitar output is already amplified so you will need to connect the guitar TRS output to the mixer TRS line input. You do not need to use the mixer preamp input because the guitar sound is already amplified.
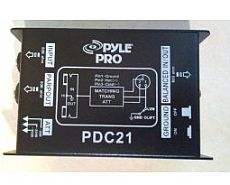
c.) Guitars with passive pickup (such as electric guitars or bass guitars) – connect them first to a DI unit that will convert the high impedance unbalanced signals to low impedance balanced audio. Then connect the DI output to the mixer preamp input. Signal flow:
Guitar — > DI Box— > Mixer Preamp input
A great DI box is Pyle-Pro PDC21

The golden rule is to pass all instrument level signals to a preamp. Do not directly connect your microphone and musical instruments to the PCI soundcard line input.
2.) Connect the mixer main output to your sound card input. Bear in mind that you are recording only one instrument or one microphone at a time. So the output that you need to record is mono. Use only one balanced mono output of the mixer and connect it to your PCI sound card balanced line input. Use TRS connector/cable because this is balanced.
Configure Audacity to accept the Recording Inputs
This tutorial is using Ubuntu 10.04 operating system but it can as well be applied with other versions of Linux. This tutorial does not use JACK as the connector. Refer to the steps below:
1.) Go to System – Preferences – Sound and click the Input tab. It should use the “Analog Microphone/Line-In/Microphone” input as the connector. See screenshot:
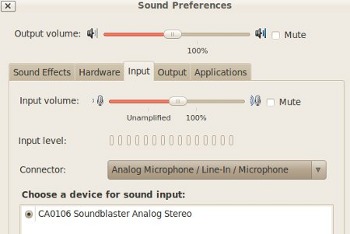
sound connector
2.) The next thing that you will do is to launch Audacity. Go to Edit – Preferences. Click “Devices” tab. Make sure the following is set:
Host: ALSA
Playback device: default
Recording device: default
Channels: 1 (mono)
3.) Click “Recording” tab in Edit – Preferences. Check “Overdub” and the set “Audio to buffer” at 100 ms as well as the latency correct to -130 ms. Uncheck “Sound activated recording”.
4.) Click “Quality” in Edit – Preferences. Select a “Default sample rate” of 96000Hz. You can as well select 48KHz or even 44KHz if you are saving disk space. Select the default sample format of “24-bit”. This ensures the best quality of your recorded sound wave. Screenshot:
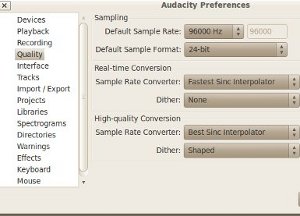
quality of recording
5.) Go to “Tracks” in Audacity Preferences (Edit – Preferences). And make sure that the Default View mode is set to “waveform (dB)”.
6.) It’s time to test if Audacity is actually detecting the sound card inputs. In the Audacity recording environment, look for a microphone symbol. It has a drop down and click on it. Click “Start monitoring”. Screenshot:
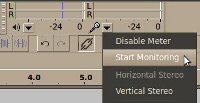
Start monitoring in Audacity
7.) Try playing your musical instrument. Audacity should capture the line level inputs from the sound card. Make sure it won’t clip. As a rule of thumb, the maximum peak level should fall below -6dB to avoid distortion or clipping.
You can see it in the Audacity input volume meter above the microphone symbol. If the volume is too low. Adjust your outboard mixer main volume output.
Note: In some rare instances you won’t be able to monitor the output of your musical instrument out of your computer speakers. But you can still record it in Audacity. Make sure the input volume level meters of Audacity are detecting your inputs.
Step3: Start the recording
Once everything is ready, you can confidently start the recording.
1.) Hit the record button of Audacity, it will start capturing the recorded signals.
2.) Play your musical instrument. As a demonstration, I tried doing the above steps with my favorite musical instrument- a jazz bass guitar.

Jazz bass player
3.) After recording, you should see the captured sound wave on the Audacity editor.
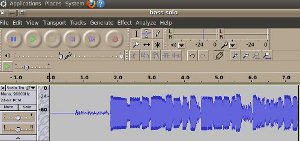
Captured sound wave
4.) You can as well create a multitrack in Audacity. Simply position to starting line to any part of the audio then click record button.
5.) To mixdown or combine tracks. Select all clips then go to Tracks – click “Mix and Render”. It will combine all your recorded tracks into one.
Note: Since your mixdown is 24-bit/96Khz WAV resolution, you need to implement dithering and sample rate conversion to convert this to 16-bit/44.1KHz format WAV. Then once it is in 16-bit/44.1Khz WAV resolution, you can then convert it to MP3 using LAME encoder. You can refer to the steps on the next section.
Converting to MP3 within Audacity using LAME Encoder
The default installation of Audacity in Ubuntu does not have an MP3 encoder. So it means that if you are processing a WAV file, you won’t be able to save or export this file as an MP3. You still need to install LAME MP3 encoder in Audacity. The good news is that the installation is easy and straightforward.
You just need to follow the steps below:
Step1.) You need to close Audacity and all audio files.
Step2.) Go to System – Administration – Synaptic Package Manager.
Step3.) Enter your Linux password.
Step4.) Under Quick Search, type “lame” (no quotes), see screenshot below:
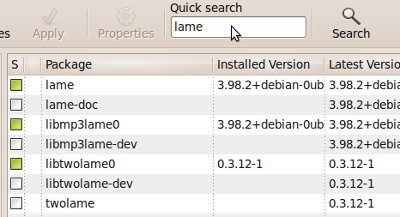
Lame mp3 encoder installed in synaptic manager
These are the packages to be installed:
a. lame = An MP3 encoding library (front end)
b. libmp3lame0 = An MP3 Encoding library
c. libtwolame0 = MPEG Audio Layer 2 encoding library
After installation, you can see they have a green color marked before them.
Step5.) After installation go to Applications – Sound & Video – Audacity. This will launch the Audacity audio editor.
Step6.) Open your Audacity project (the one you need to be exported as MP3). Go to File – Open.
Step7.) Go to File – Export. Type the metadata (only Artist name and Track title are important).
Click “Add” and then OK.
Step8.) Make sure “MP3 files” are selected. You can click Options to set the MP3 bit rate. Type the file name of the MP3 and then finally click “Save”. Below is a sample sound recording of a bass guitar solo done using Audacity in Ubuntu:
Content last updated on July 14, 2012