
File management is often a problem for engineers and producers in home recording studio. The result is a mess and highly disorganized file structure for recording projects. As a result, things can be delayed, aborted and re-do if these files are not taken care of.
This post will recommend the best solutions for file management in Reaper digital audio workstation. This will hopefully work with any DAW and operating system you are using. Let’s get started.
Organizing Reaper Project Files- Tracking to Mixing
Everything starts with a project name. This project can be an album or a song project. An album project is more complex as it contains a lot of songs on it. Let’s use an album example because this is mostly the goal of most home music production projects.
1.) Start by creating a folder named “Albums” in your biggest hard drive (ideally dedicated to saving audio or audio recording projects).
This means all album projects are in this folder. This makes it easy for you to locate.
2.) Inside the albums create a new folder every album project. I recommend including the artist name, tentative album name (if not yet finalized) and the project year. For example:

Album name
This is important because if the same artist will be recording in your studio more than once, you can easily locate the previous album projects for reference.
3.) Go inside the current/empty artist album project folder. Create a new folder for each song to be recorded and produced. Therefore you will be using the song/track title as the folder name.
4.) Go inside the song folder and create the following folders:
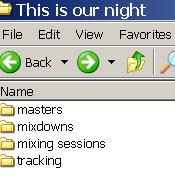
Project folders inside the album
a.) tracking – this is the folder where you will be saving all your recorded tracks.
For example, below are files inside the tracking folder:
Recorded tracks in reaper
b.) mixing sessions – this is the folder where you will be saving all the mixing session files (e.g. Reaper project file), e.g. screenshot below:
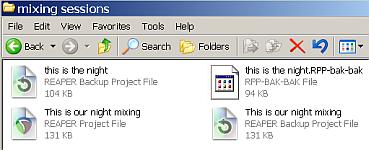
Mixing session files
In case of remix which are very common, you will be saving the several remixes here if necessary. Just include “remix1” in the session/project file name.
c.) mixdowns – you will save your high resolution mixdowns here (e.g. 24-bit/48KHz)
d.) masters– if the song has some completed masters (after mastering process), save it here.
Configure Reaper to save to Organized Folders
By default, Reaper will automatically saved all recorded tracks to “My Documents” folder named as “REAPER Media”. To change this to your organized folders, follow the steps below:
1.) Launch Reaper.
2.) Open your project files.
3.) To make Reaper automatically saved recorded tracks to your organized “tracking folder”, go to File – Project Settings.
4.) Go to Media tab.
5.) In the Path to save media, browse to the tracking folder of your project. For example:
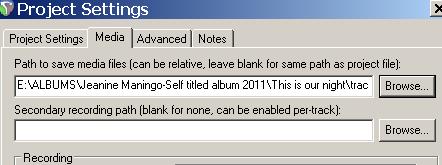
Save media path
Click OK to apply the settings
Best practices in naming Track/Recorded Files
By default, Reaper will save files using this file name format:
“Tracknumber-Trackname-Timestamp[xx].wav”
I recommend the following work flow when tracking audio in your project:
1.) In Reaper, go to Insert – Insert New Track.
2.) Assign a track name to that newly inserted track. For example, I would add a bass guitar track to the song, see screenshot below:
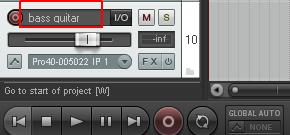
Newly added track in Reaper
3.) Thus, when you finally hit the record button and start tracking and then saving the file. It will contain the name of the track (which is a bass guitar track) in the saved files. This is highly important in efficient file management using Reaper.
Content last updated on July 29, 2012